Introduction of drywall
Drywall, also known as plasterboard, wallboard, or gypsum board. it is a panel made of gypsum, a powdery white or gray sulfate mineral, sandwiched between two paperboards. It is used in the construction of interior walls and ceilings as a replacement for plaster. Drywall is easy to install and provides excellent sound control, structural integrity, and fire resistance. It’s also easy to decorate and serves as a good base for different actions. Like painting, wallpaper, paneling, textured finishes, decorative fabric, and vinyl wall coverings.

Drywall comes in a wide variety of lengths, thicknesses, and special-use materials. and it is the preferred surface for walls and ceilings in residential construction. Drywall was invented in 1916 as a dry alternative to plaster. and it took 25 years before it was widely accepted as a proper building material. Today, it is the staple of a billion-dollar construction industry that depends on quick demolition and installation.
How to Finish drywall (step by step)
To finish drywall in 10 steps, you can follow these general guidelines.
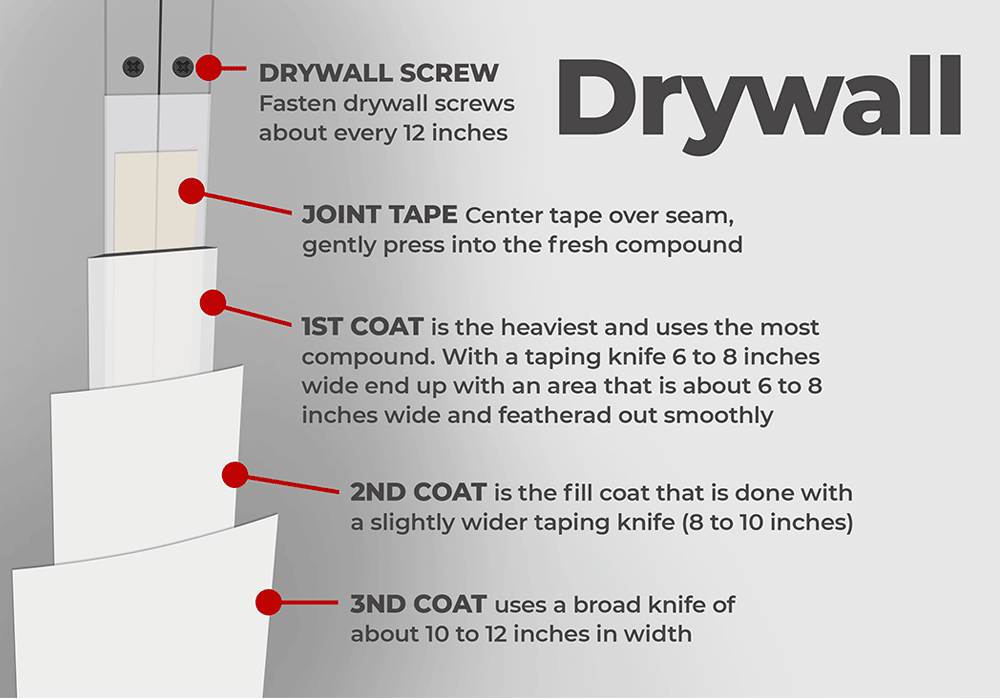
1. Inspect the Walls. First step to finish drywall involves inspecting walls to ensure the drywall is properly installed and there’re no visible issues. This includes checking for any protruding screws or nails and making sure the seams are smooth and even. Additionally, it’s important to ensure drywall is clean and free of any dust or debris before proceeding with next steps.
This initial inspection sets the foundation for the subsequent steps in the drywall finishing process. And ensuring that the surface is ready for the application of joint compound and tape.
2. Mix the Joint Compound. next step in finishing drywall involves mixing the joint compound according to the manufacturer’s instructions. The joint compound is used to cover the joints and screw heads in the drywall. It’s important to mix the compound thoroughly to ensure a consistent texture and to avoid any lumps or air pockets. Once the compound is mixed, it’s ready to be applied to the drywall.
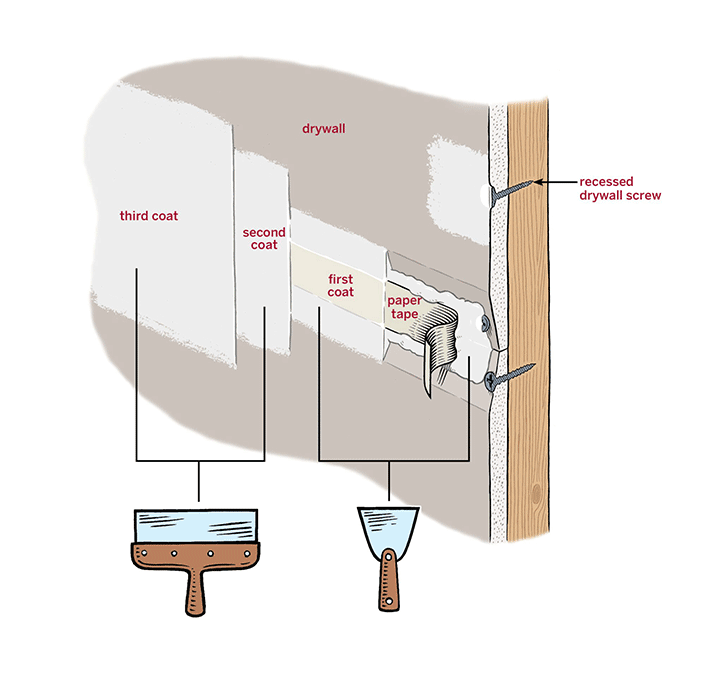
3. Prep Surfaces. Third step to finish drywall involves prepping the surfaces by covering the joints and screw heads with mixed joint compound. This process is also known as “mudding.” After mixing the compound, it should be applied over the seams and screw indentations using a drywall knife or trowel. The goal is to create a smooth and seamless surface. It’s important to apply the compound evenly and to remove any excess material. This step sets the foundation for the subsequent taping and finishing of the drywall.
4. Apply Paper Tape. Once the joint compound is applied to the seams and screw indentations, the paper tape is placed over wet compound. The tape should be embedded into the compound using a drywall knife or trowel. In order to ensure a strong bond and a smooth finish. Any excess compound should be removed to achieve a flat surface. This step is crucial for creating seamless and durable joints in the drywall.
5. Smooth Tape. After applying the paper tape over the joints, it’s essential to use a drywall knife or trowel. In order to smooth the tape and remove any excess compound. This process helps to create a seamless and flat surface. ensuring that the joints are well covered and will not be visible once the finishing is complete.
6. Apply First Coat of Compound. next step to finish drywall involves covering all joints and screw heads with a thin layer of joint compound. This is the first coat of compound, also known as the taping coat. The goal is to fill the voids and imperfections in the joints and screws. The compound should be applied evenly and feathered out to create a smooth transition between the drywall and joint compound. It’s important to allow this coat to dry completely before proceeding to the next step.
7. Apply Second and Third Coats. After the first coat has dried, additional compound coats are applied to further smooth out the surface and feather edges. Each coat should be wider than the previous one to blend the area with the surrounding wall. Sanding between coats may be necessary to achieve a seamless finish. It’s important to allow each coat to dry completely and to sand the surface before applying the next coat.
8. Sand and Smooth. After the final coat of joint compound drys, the surface should be sanded to achieve a smooth and seamless finish. Sanding helps to blend the joints and remove any ridges or imperfections in the compound. It’s important to use fine-grit sandpaper and to sand lightly to avoid damaging the drywall. Once the surface is smooth, it’s ready for the application of texture or primer, depending on the desired finish.
9. Apply Texture or Primer (if desired). the next step to finish drywall involves applying texture or primer, depending on the desired finish. If a textured finish is desired, the texture can be applied using a spray gun or a roller. If a smooth finish is desired, a coat of primer should be applied to the drywall. The primer helps to seal the surface and provides a base for the paint. It’s important to allow the texture or primer to dry completely before proceeding to the final step.
10. Finish with Paint or Wallpaper. Once the texture or primer is dry, the drywall is ready for the final step. If paint is desired, it should be applied using a roller or brush. It’s important to use a high-quality paint and to apply it evenly to achieve a smooth and durable finish. If wallpaper is desired, it should be applied according to the manufacturer’s instructions. It’s important to ensure that the surface is clean and free of any dust or debris before applying the wallpaper. Once the paint or wallpaper is applied, the drywall finishing process is complete.
The time it takes to finish a drywall can vary depending on several factors. According to search results, an efficient drywalling crew can typically complete the work anywhere between six days to four weeks. The duration can be influenced by different factors. such as the size of the home, complexity of the framing, height of walls and ceilings. And also type of drywall finish, size and experience of the crew, weather conditions, and humidity are effective. The finishing process itself involves several steps, including taping, mudding, sanding, and texturing, which can take several days to complete. It’s important not to rush the process to avoid any future issues with the finish. Therefore, it’s recommended to allow enough time for each step to dry completely before proceeding to the next step.