Step-by-Step Guide to Using Gypsum Powder for Wall Coating
Gypsum powder has become one of the most reliable materials for achieving smooth, durable, and professional wall finishes. Whether you are a contractor or a DIY enthusiast, gypsum plaster provides the ideal blend of workability, strength, and aesthetic quality. It dries quickly, bonds well with different surfaces, and delivers a clean white base for paint or decorative coatings. In this detailed step-by-step guide, you’ll learn exactly how to prepare, mix, and apply gypsum powder to your walls for the best results.
Why Gypsum Powder Is Ideal for Wall Coating
Gypsum powder is widely preferred in modern construction due to its advantages like natural smoothness, lightweight composition, and quick-setting characteristics. Unlike cement-based coatings, gypsum plaster offers a finer finish that requires little to no sanding. This makes it an excellent choice for interior applications where aesthetic appeal is crucial.
Another advantage is its versatility. Gypsum powder adheres beautifully to concrete walls, blockwork, old plaster, and even gypsum board. Because of its breathability, it allows walls to regulate moisture, reducing the risk of mold and cracking. The material also provides some thermal and acoustic benefits, creating a more comfortable indoor environment.
Additionally, gypsum is easy to work with. Its creamy texture spreads smoothly, making it suitable for both large surface areas and detailed finishing work. Whether you’re leveling uneven surfaces or preparing walls for decorative coatings, gypsum plaster gives you predictable and consistent results.
Preparing the Wall Before Coating
Proper surface preparation is essential for achieving long-lasting adhesion. Start by thoroughly cleaning the wall. Dust, debris, loose paint, or grease can prevent the plaster from bonding correctly. Use a dry brush, vacuum, or a damp cloth to remove all loose particles. If the wall has any signs of moisture, make sure the issue is resolved before applying gypsum.
Next, inspect the wall for cracks or deep holes. These should be filled using a patching compound or a small amount of gypsum plaster. Allow the repairs to dry completely before you proceed. If the surface is extremely dry or porous, lightly mist the wall with water. This prevents the wall from absorbing moisture from the plaster too quickly, which can cause premature drying and cracking.
Finally, ensure that all tools—trowels, mixing buckets, and spatulas—are clean. Even small particles of hardened plaster can affect the smoothness of the final coat.
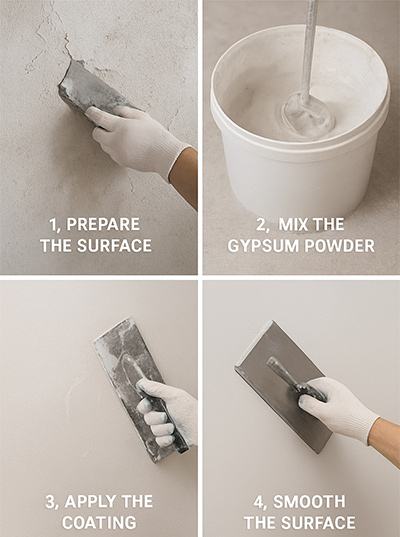
Mixing Gypsum Powder Properly
How you mix the gypsum powder determines the quality of your wall finish. The rule of thumb is simple: always add gypsum powder to water, not the other way around. This method ensures an even hydration and prevents the mixture from forming lumps.
Fill your bucket with clean, cool water up to one-third of its capacity. Slowly sprinkle gypsum powder over the surface of the water. Let it absorb naturally for a few minutes. When the powder sinks, begin mixing gently using a paddle mixer or hand trowel. Avoid vigorous stirring, which adds air bubbles and weakens the plaster.
The ideal consistency is creamy and spreadable—thick enough to stay on your trowel, but soft enough to glide smoothly across the wall. If the mixture becomes too thick, you can add a small amount of water, but avoid over-diluting it.
Applying the First Coat
Once your plaster is ready, start applying the first coat. Hold the trowel at a 30-degree angle and spread a thin, even layer across the wall. Your goal at this stage is not to achieve the perfect finish but to cover the surface and fill shallow imperfections.
Work in controlled sections, as gypsum sets quickly. Try to maintain consistent pressure and movement to avoid ridges and uneven spots. Scrape off any excess plaster with the edge of the trowel. This initial layer is typically thin but forms the foundation for the final coat.
After completing the first coat, let it set for 10–15 minutes. Depending on the environment, gypsum may dry faster or slower, so keep an eye on the texture. When it becomes firm but still slightly damp, you’re ready for the next stage.
Adding the Finishing Coat
The finishing coat is where the wall transforms from rough to flawless. Prepare a slightly smoother and softer batch of plaster. Apply it in long, sweeping strokes, overlapping each pass to ensure a seamless surface. This coat should be thinner than the first, focusing on refinement rather than coverage.
As the plaster begins to firm up, lightly mist the surface with water and use a clean trowel to smooth out any minor imperfections. This polishing step helps achieve a glossy, uniform finish similar to professional interior walls.
Take your time—rushing the finishing coat often leads to streaks, waves, or rough patches that show after painting.
Drying and Final Preparation
Allow the plaster to dry naturally for 24–48 hours. Avoid using heaters or fans because rapid drying causes cracks. Once fully dry, the wall should appear bright white, smooth, and ready for paint, wallpaper, or any decorative finish.
Before applying paint, wipe the wall with a dry cloth to remove any dust. If you prefer an ultra-smooth surface, gently sand using fine-grit sandpaper.
Conclusion
Using gypsum powder for wall coating is one of the most effective ways to achieve smooth, durable, and professional-looking interior surfaces. When mixed and applied correctly, gypsum plaster creates a strong bond with walls, minimizes surface imperfections, and provides an ideal base for paint or decorative finishes. Its fast setting time, ease of application, and clean white appearance make it a preferred choice for both DIY users and professional contractors.
By following the correct steps—proper wall preparation, accurate mixing, controlled application, and natural drying—you can significantly improve the quality and lifespan of your wall coating. Whether you are working on new construction, renovation, or interior upgrades, high-quality gypsum powder ensures consistent results, reduces rework, and delivers a flawless finish that enhances the overall look of your space.