Using All Purpose Joint Compound for Multi-Layer Drywall Installations
In the world of drywall installation, achieving a smooth and professional finish is crucial, especially when working on multi-layer drywall systems. One of the most versatile and effective materials for this purpose is all-purpose joint compound. Known for its ease of use and adaptability, it’s widely favored by professionals and DIYers alike for covering seams, cracks, and creating a seamless finish in drywall projects.
This article will delve into the process of using all-purpose joint compound for multi-layer drywall installations, with a specific focus on covering seams and cracks. Along the way, we’ll explore best practices, step-by-step methods, and expert tips to ensure optimal results.
What is All Purpose Joint Compound?
All-purpose joint compound, also referred to as drywall mud, is a gypsum-based paste commonly used in drywall finishing. This versatile compound can be applied in various stages of drywall installation, including embedding joint tape, filling seams, repairing cracks, and smoothing surfaces before painting or texturing.
Unlike specialized compounds that are tailored for specific tasks like taping or topping, all-purpose joint compound is formulated to handle every stage of the drywall finishing process. Its slower drying time and easy-to-sand texture make it ideal for multi-layer applications where multiple coats may be required.
Using All-Purpose Joint Compound for Multi-Layer Drywall Installations
Multi-layer drywall installations typically involve several layers of drywall that offer enhanced soundproofing, fire resistance, or structural support. While these additional layers can provide various benefits, they also introduce more seams, joints, and potential cracks that need to be properly treated to achieve a flawless finish.
All-purpose joint compound is a key tool for ensuring a smooth surface across multiple layers of drywall, as it is formulated to bond well with paper tape and mesh tape, fill seams effectively, and create a strong, long-lasting bond. Additionally, its flexibility allows it to be applied in thick layers, which is often necessary for multi-layer drywall systems.
Step-by-Step Guide
- Preparation of the Surface
Before applying the joint compound, ensure the drywall surface is clean and smooth. Remove any dust, dirt, or debris that may interfere with the adhesion of the compound. It’s also essential to ensure all screws or nails are securely fastened slightly below the surface to avoid bumps after the compound is applied.
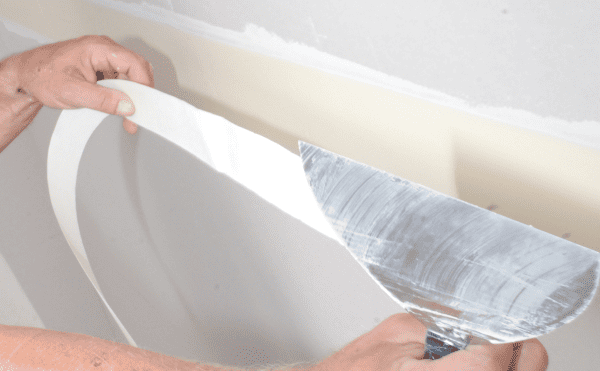
- Applying Joint Tape
Begin by applying joint tape over all the seams where two drywall panels meet. Joint tape serves as a reinforcement that helps prevent cracks from forming along the seams.
For multi-layer drywall installations, both paper tape and fiberglass mesh tape are commonly used. Paper tape is ideal for straight seams, while mesh tape works well for joints prone to movement, such as those around doors and window.
After positioning the tape, press it into the seam using a joint knife to ensure proper adhesion.
- First Coat of Joint Compound
With the joint tape securely in place, it’s time to apply the first coat of all-purpose joint compound. Using a 6-inch joint knife, scoop a generous amount of compound and spread it over the taped seams. This initial coat should be relatively thin but sufficient to embed the tape into the drywall surface.
Spread the compound evenly over the joint, feathering the edges to blend it smoothly with the drywall. Be sure to cover all the joints and fasteners during this phase.
For multi-layer drywall installations, this first coat is crucial for filling deeper seams that may have formed due to the thickness of multiple layers. Allow the compound to dry completely, which typically takes 24 hours, depending on the room’s humidity and temperature.
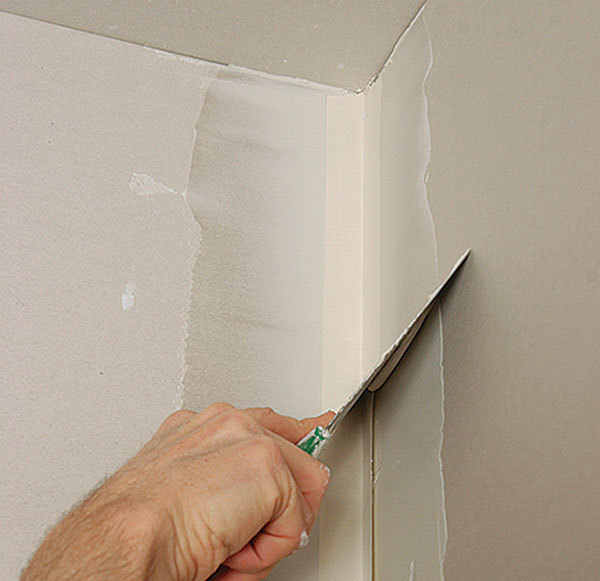
- Second and Third Coats of Joint Compound
After the first coat is dry, lightly sand the surface with fine-grit sandpaper to remove any bumps or uneven areas. Then, apply the second coat of joint compound using a 10-inch joint knife. This coat should be slightly wider and thicker than the first, extending beyond the edges of the first coat to further smooth the transition between the drywall panels and seams.
Repeat this process for the third and final coat, using a 12-inch joint knife for even broader coverage. At this stage, it’s important to focus on feathering the edges well to ensure a seamless finish.
For cracks in drywall, the same process applies. Begin by taping the crack, then apply multiple coats of joint compound, allowing each coat to dry thoroughly and sanding between coats to achieve a smooth, uniform surface.
- Final Sanding and Touch-Ups
Once the final coat has dried, inspect the surface for any imperfections. Lightly sand the entire area to achieve a perfectly smooth finish. Sanding is a critical step for achieving professional-looking results, especially in multi-layer installations.
- Finishing Touches: Priming and Painting
After sanding the final coat of all-purpose joint compound, you’re ready for the final step: priming and painting. Since joint compound is more porous than drywall, it’s essential to apply a coat of primer to ensure even paint coverage and prevent the finish from looking patchy. A high-quality primer will seal the compound and create a uniform surface, allowing the paint to adhere smoothly.
For multi-layer drywall installations, this priming step is even more important, as the seams and cracks covered with multiple layers of compound might absorb more paint than the surrounding drywall. Without proper priming, this could lead to inconsistent textures or finishes.
Once the primer has dried, you can proceed with painting your walls or applying any decorative finishes. Your drywall should now have a smooth, seamless appearance, with no visible cracks or seams.
Tips for Success with All-Purpose Joint Compound in Multi-Layer Drywall Installations
Using all-purpose joint compound effectively requires patience and attention to detail, especially in multi-layer drywall systems. Here are some expert tips to ensure success:
Work in Thin Layers: It’s tempting to apply thick coats of joint compound to speed up the process, but this often leads to excessive shrinkage and cracking. Multiple thin coats are better for building a smooth finish that’s less prone to imperfections.
Use the Right Tools: The size of your joint knife should increase with each coat. Start with a 6-inch knife for the first coat, move to a 10-inch knife for the second, and use a 12-inch knife for the final coat. This will help feather the edges effectively and create a more professional finish.
Allow Proper Drying Time: Rushing the process by applying coats before the previous layer has dried can lead to cracks and other issues. Always allow each coat to dry completely before moving on to the next.
Sanding is Key: Sanding between coats is essential for eliminating bumps and ridges. However, be careful not to over-sand, which can weaken the compound and create depressions. Use fine-grit sandpaper and light pressure for best results.
Humidity and Temperature Matter: If you’re working in a humid environment or cold temperatures, the drying time of the compound may be significantly longer. Consider using setting-type joint compound in these situations, which dries via chemical reaction rather than air drying.
Practice Patience: Achieving a perfect finish with joint compound takes time and practice. It’s important to take your time with each step, from applying joint tape to sanding between coats, to avoid mistakes that could require extensive rework.
Conclusion
Using all-purpose joint compound for multi-layer drywall installations is an excellent way to achieve a smooth, seamless finish, especially when covering seams and cracks. Its versatility makes it suitable for all stages of the drywall finishing process, from embedding tape to applying final coats. By following the step-by-step guide and implementing expert tips, you can create a professional-looking result that’s ready for priming and painting.
Whether you’re a DIY enthusiast or a professional, mastering the use of all-purpose joint compound in multi-layer installations will help you tackle even the most complex drywall projects with confidence. Remember to take your time, work in thin layers, and prioritize smooth transitions for the best outcome.
With the right approach, all-purpose joint compound can transform your drywall installation into a flawless, durable surface that stands the test of time.